
First steps on container orchestration using Docker Swarm
Nowadays Docker is an essential tool. As the infrastructure grows, the process becomes more complicate if we don't have specific tools. The solution: swarm


Si querés leer este post en español, clickeá acá.
Docker has become an essential tool in my daily life as a developer. From my first experiences, I have tried to include it in my projects, and over time I have managed to use it incrementally in the following ways:
- Setup third party components (database engines, inverse proxies, redis servers, etc...)
- Create static definitions of these components with
docker-composeto share between development environments. - Script the creation of my own components with
Dockerfilesand use them indocker-compose.ymlto facilitate the development of distributed architectures. - Use a private
docker registryto publish my images and use them indocker-compose.yml. - Create alternative
docker-compose.ymlfiles to use them in deploys. - Leverage
docker-machineprovision/manage capabilities to simplify deploys
Although docker-compose and docker-machine certainly help in all these ways, as the infrastructure grows both horizontally and vertically you will need to start thinking in terms of herd/cluster of servers, and the process will grow in complexity if you do not have specific tools for this purpose.
The solution proposed by Docker to solve this problem is called Swarm.
What is Docker Swarm?
Swarm is a Docker functionality used for orchestration of service clusters, which helps in distribution and management of dockerized systems on multi-host infrastructures. To use it you do not need more than the docker engine installed, since it's natively included from version 1.12. Some of it's benefits are:
- CLI for creation and administration of server clusters
- Simple and declarative Service model
- Scaling of Services according to load
- Rolling updates
- Easy and secure distributed networking
- Load balancing
- Service discovery
Next I will make a walk-through on the configuration of a Swarm and deployment of a micro-services application on a 3-server infrastructure.
Prerequisites
To follow this step-by-step, you should start from a host with the main docker tools already installed (docker, docker-compose and docker-machine). I will be using an Ubuntu host, although the same can be achieved on Windows, Mac or other Linux distros, with just minor changes. It is also required to have Virtualbox installed for the creation of virtual machines.
I will try to focus on the commands referring specifically to Docker Swarm, so a basic notion of the mentioned tools is also recommended.
Machines Setup
The first step to get a Swarm is the creation and provision of the machines that will serve as nodes for the cluster. In our case we are going to use docker-machine to provision 3 virtualbox machines in our host, but it is important to stress that this is not necessary for the creation of a Swarm. It's actually enough to have hosts that can communicate with each other through the ports that docker require (for example, different EC2 machines in AWS).
$ docker-machine create --driver virtualbox manager
$ docker-machine create --driver virtualbox node1
$ docker-machine create --driver virtualbox node2
Note we have created a machine named manager. This constitutes one of the main definitions of Docker Swarm:
At least one of the nodes of a Swarm will have the Manager role, while the others will be Workers.
The Manager node will be the entrypoint for all the operations we do with the Swarm. It is worth mentioning that the Manager nodes also function as Workers.
Once created, we confirm the operation and check the status of the nodes executing
$ docker-machine ls

NAME    ACTIVE DRIVER     STATE   URL                       SWARM DOCKER ERRORS
manager -      virtualbox Running tcp://192.168.99.100:2376 v17.11.0-ce
node1   -      virtualbox Running tcp://192.168.99.101:2376 v17.11.0-ce
node2   -      virtualbox Running tcp://192.168.99.102:2376 v17.11.0-ce
It is important that we save the IP of the manager node (192.168.99.100). We will need it soon.
Creation of the Swarm
The next step is to initialize the Swarm from the manager node and subscribe the workers.
To do this we will first hook up with the manager using docker-machine
$ eval $(docker-machine env manager)
Then run the command that will initialize docker (of the manager) in Swarm mode
$ docker swarm init --advertise-addr 192.168.99.100

Swarm initialized: current node (6wnrcrp7s1qdep5i33uu9whx1) is now a manager.

To add a worker to this swarm, run the following command:
    docker swarm join \
    --token SWMTKN-1-44q15h6meqlfahv2fwnnm70c7x5dnqrpagr3gw2n2pgf46v54e-drivwn8ma0zz3r223plnt4q70 \
    192.168.99.100:2377

To add a manager to this swarm, run 'docker swarm join-token manager' and follow the instructions.
The --advertise-addr flag specifies the address that the Workers will use to register to the Swarm. Here we can choose the best address depending on the environment, it could be a private or public one. Here we will use the one docker-machine gave us (192.168.99.100).
Copy the command. If we need to get it back later, we can run one of these two commands (always from the manager), depending on whether we want to subscribe a Worker or a Manager
$ docker swarm join-token worker
$ docker swarm join-token manager
Worker Nodes Subscription
Once we have Swarm created in our Manager node, we should now register the Worker nodes.
To do this we will connect to one of the Workers using docker-machine
$ eval $(docker-machine env node1)
And we will run the command obtained previously, exactly as we copied it
$ docker swarm join \
    --token SWMTKN-1-44q15h6meqlfahv2fwnnm70c7x5dnqrpagr3gw2n2pgf46v54e-drivwn8ma0zz3r223plnt4q70 \
    192.168.99.100:2377

This node joined a swarm as a worker.
Once we repeat these two steps for each of the Workers, we will be able to verify our Swarm by reconnecting to the Manager (with docker-machine) and running
$ docker node ls

ID                         HOSTNAME STATUS AVAILABILITY MANAGER STATUS
lf2kfkj0442vplsxmr05lxjq * manager  Ready  Active       Leader
1m9rdh9hlkktiwaz3vweeppp   node1    Ready  Active
pes38pa6w8xteze6dj9lxx54   node2    Ready  Active
If everything worked fine, we will get a view of all the nodes that make up our cluster, indicating which is the Manager (Leader) and the status of each one.
Deploying our application
At this point we have created the Swarm, composed of 3 nodes, one of them Manager and the other Workers. As I mentioned earlier, the Manager will be the node from which we will operate on the cluster, so we connect to it
$ eval $(docker-machine env manager)
We are ready now to deploy our Stack! But before doing so, let's review a bit of the new terminology introduced by Swarm:
- a Stack is a collection of Services that make up our system. It is written in a YML file in a similar way to a
docker-compose.yml, with services, networks, volumes, etc ... - a Service is a specific component of our system. It defines its base image, environment variables, main command, etc... as in a
docker-compose.yml. In the context of a Swarm, Services also include adeploykey with details for a specific environment (number of replicas, restart_policy, etc...) - Tasks are located one level below the Services, and represent specific instances of them. They are merely containers running within a compatible node. Swarm will start a Task for each replica that a Service require.
- the Nodes are the work units that Swarm will have to run the Tasks. Being a Manager, a Node will also be the host docker from where we can interact with the Swarm.
Although Docker allows the creation of Swarm Services manually, here we will focus creating them using YML Stack files (similar to docker-compose vs docker run)
For our example, let's take the classic voting app from dockersamples, which consists of 5 services (some properties were removed for simplicity):
version: "3"

services:
  redis:
    image: redis:alpine
    ports:
      - "6379"
    deploy:
      replicas: 2
      restart_policy:
        condition: on-failure
  db:
    image: postgres:9.4
  vote:
    image: dockersamples/examplevotingapp_vote:before
    ports:
      - 5000:80
    depends_on:
      - redis
    deploy:
      replicas: 2
      restart_policy:
        condition: on-failure
  result:
    image: dockersamples/examplevotingapp_result:before
    ports:
      - 5001:80
    depends_on:
      - db
    deploy:
      replicas: 1
      restart_policy:
        condition: on-failure
  worker:
    image: dockersamples/examplevotingapp_worker
    deploy:
      mode: replicated
      replicas: 1
      restart_policy:
        condition: on-failure
  visualizer:
    image: dockersamples/visualizer:stable
    ports:
      - "8080:8080"
    volumes:
      - "/var/run/docker.sock:/var/run/docker.sock"
    deploy:
      placement:
        constraints: [node.role == manager]
As you can see, a docker-stack.yml is very similar to a traditional docker-compose.yml. The main difference is the addition of the deploy element, which is used by Docker to customize the deployment options for our Services in the context of a Swarm.
In our example we only use a few deploy options, but it is worth diving in the documentation since here lies the greatest power of Swarm.
To deploy our Stack in the Swarm, we will run the following command:
$ docker stack deploy -c docker-stack.yml mystack

Creating network mystack_default
Creating service mystack_result
Creating service mystack_worker
Creating service mystack_visualizer
Creating service mystack_redis
Creating service mystack_db
Creating service mystack_vote
The last argument is the name of the Stack, which will serve as a prefix for all Services and for use in certain commands.
From this moment, Swarm will begin the deployment, creating a Task for each one of the replicas of our Services, which will end up being simply a container in one of the available nodes.
Swarm Monitoring
The deploy process may take some time to complete, depending on the size of the Stack. Swarm offers several commands for monitoring, such as (always connected to the Manager):
List the Stacks:
$ docker stack ls

NAME     SERVICES
mystack  6
List Services of a Stack:
$ docker stack services mystack

ID            NAME            MODE        REPLICAS  IMAGE                                           PORTS
edq3ekyi2fm0  mystack_worker  replicated  0/1       dockersamples/examplevotingapp_worker
o6c2uzibyjsn  mystack_result  replicated  1/1       dockersamples/examplevotingapp_result:before    *:5001->80/tcp
qkvq214nnrcq  mystack_vote    replicated  2/2       dockersamples/examplevotingapp_vote:before      *:5000->80/tcp
r8xx2yfeckeg  mystack_redis   replicated  1/2       redis:alpine                                    *:0->6379/tcp
ui42d228wsem  mystack_visu... replicated  0/1       dockersamples/visualizer:stable                 *:0->8080/tcp
w6qmnih17ucs  mystack_db      replicated  0/1       postgres:9.4
Here we can see the number of replicas started for each Service. We can see some of them are not up yet.
List Tasks of a Stack:
$ docker service ps mystack

ID            NAME                  IMAGE                                         NODE     DESIRED STATE  CURRENT STATE             ERROR  PORTS
tvbmsi6fdrnf  mystack_worker.1      dockersamples/examplevotingapp_worker         node1    Running        Running 6 minutes ago
pcahy7rhiw5d  mystack_vote.1        dockersamples/examplevotingapp_vote:before    node1    Running        Running 13 minutes ago
s4qtcjypq69l  mystack_vote.2        dockersamples/examplevotingapp_vote:before    manager  Running        Running 9 minutes ago
tobpx1qa14k9  mystack_db.1          postgres:9.4                                  node2    Running        Running 5 minutes ago
taszc0iqdudj  mystack_redis.1       redis:alpine                                  node2    Running        Running 7 minutes ago
t2uoqi4lnt15  mystack_result.1      dockersamples/examplevotingapp_result:before  manager  Running        Running 11 minutes ago
kil75smj8jtk  mystack_redis.2       redis:alpine                                  node1    Running        Running 12 minutes ago
nrug50wf3r5i  mystack_visualizer.1  dockersamples/visualizer:stable               manager  Running        Running 7 minutes ago
What's interesting here is that we can see in which node each task is running, besides any error that we may have.
View the log of a particular Service (composed of all of it's replicas):
$ docker service logs mystack_vote

...
You probably noticed one Service in the stack called visualizer that was not part of our application. This component exposes a web page with a graphic representation of the Swarm, updated in real-time, together with relevant details of each Task.
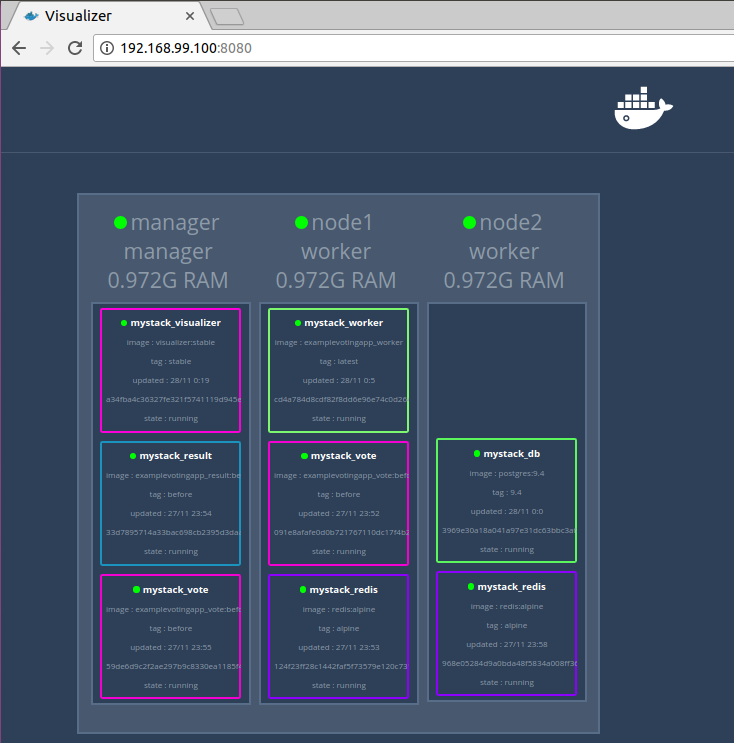
Accessing my Services - Routing Mesh
If you stopped to look at the address bar of the previous image, you may be wondering how that url ends up showing the content of the visualizer Service.
Swarm offers two alternative strategies to resolve access to Services from the outside world. We will cover the simplest form, which is called Routing Mesh and works as follows:
Before explaining any further, open your browser and go to http://192.168.99.100:5000/ (if you haven't already done so) and contemplate a shimmering Voting app running inside the Swarm!
So, what has just happened here?
Of course, we have just accessed our vote Service's port 80 pointing to the manager node IP (192.168.99.100), on port 5000. Swarm Routing Mesh makes this possible offering these features 100% out-of-the-box:
- Service Discovery: Each Service can make use of a Swarm public port to publish inner ports and become reachable. Access to a Service is achieved pointing to the IP of any node of the Swarm on the published port, even if the service has no running Tasks on that node.
- Load Balancing: For Services running more than one replicas (Tasks), you will get Load Balancing for free when pointing to a service.
We can verify the Load Balancing feature refreshing our vote page a few times and checking the container where it's being served from.
Docker Swarm offers this and much more regarding container networking on distributed infrastructures, you can dive in the documentation to learn more.
Conclusion
The configuration and implementation of a Docker Swarm turned out to be a very straight-forward experience, guided by excellent documentation, which allowed configuring a complex infrastructure, with advanced management, monitoring and troubleshooting capabilities without having in-depth knowledge of server management, networks configuration, security, etc...
Without having tried alternative products (such as Kubernetes) yet, I definitely recommend getting into Docker Swarm to kickoff / expand your devops skills.
On future posts, I'll expand on more advanced topics, such as:
- Deploying a Swarm on AWS, caveats and considerations.
- Service-to-service communication: overlay networks
- Rolling Updates
- Tailoring your Service deployments
- Swarm Scaling capabilities
Leave me a comment telling me which ones interest you the most!